Custom Order Invoice Number Module for Magento 2
Managing the format of sales entities like order numbers, invoice numbers, shipment numbers, and credit memo numbers can be a tedious task for online store owners. This is where the custom order invoice number module for Magento 2 comes in, providing a flexible solution for this issue.
Related Blogs
1. Manage Magento 2 Banner Slider on Your Storefront with the Banners Module
2. Cancel orders with magento 2 cancel order module
3. Advanced custom links module
4. Make my shipping rule extension
Flexible formatting
The module enables store owners to add prefixes and suffixes to all the sales entities mentioned above. This can be done using predefined codes that represent day, month, year, time or country code of the store, or by adding a custom string. Furthermore, the padding length of the main number can be altered in the backend configuration, making it even easier to customize the format.
Reset counter option
Store owners have the option to reset the counter for order numbers, invoice numbers, shipment numbers, and credit memo numbers or to define a period in which the counter will automatically reset (such as every day, week, or year).
Click here to purchase this module
Key features
- The module allows you to customize order numbers, invoice numbers, shipment numbers, and credit memo numbers to your liking.
- You can use various variables such as the day, month, year, time, and country code of your store in the prefix and suffix.
- The module also allows you to create custom prefix and suffix combinations using any combination of letters, numbers, dates, or time.
- Store owners can set the custom padding length for all four sales entities and separate prefix, suffix, and number padding lengths for each.
- The numbers can be reset manually or at a predefined interval, making it easier to manage your sales entities.
- The custom order invoice number module is simple to install and easy to configure from the Magento backend.
Installing the Custom Order Invoice Number
- Purchase the extension and navigate to the “My Downloadable Products” section under your account.
- Enter the domain name where you wish to use the extension and add the domain to receive a license key and a link to download the extension zip. The license key is only valid for one main domain and up to 3 subdomains of the main domain.
- If you purchased the extension from the Magento marketplace, obtain the license key from here
- Unzip the downloaded file.
- Locate the module folder within the zip file and move it to app/code/WebbyTroops.
- Install the Core module using the command
composer require webbytroopstechnologies/magento2-module-core - Run the command
php bin/magento setup:upgrade - Flush the Magento cache by running the command
php bin/magento cache:flush
1. Introduction and Purpose
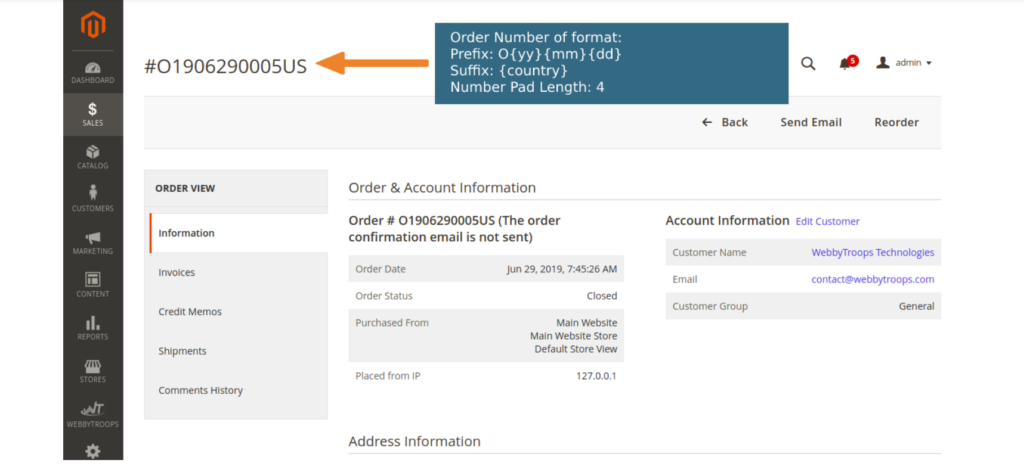
The purpose of this module is to make the process of managing sales entity numbers easy and efficient for online store owners. With this module, store owners can customize the format of their numbers using predefined codes for the year, month, date, and country of the store.
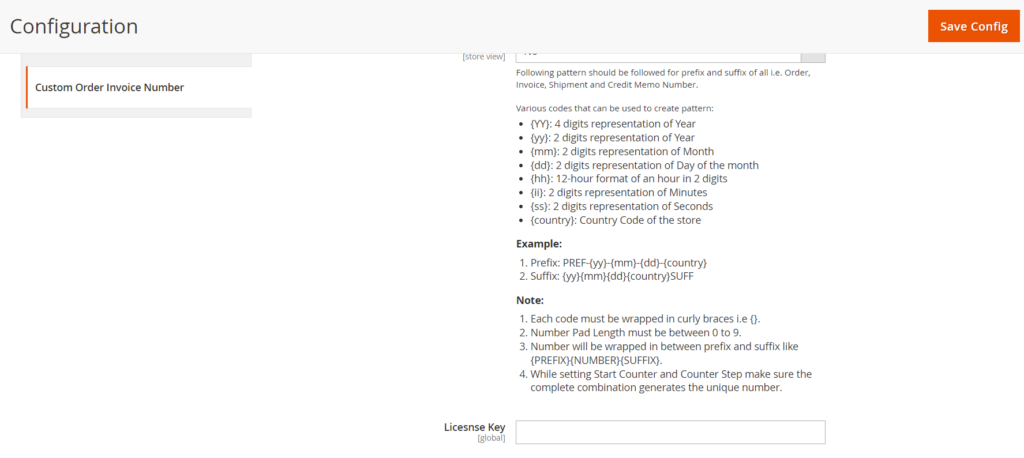
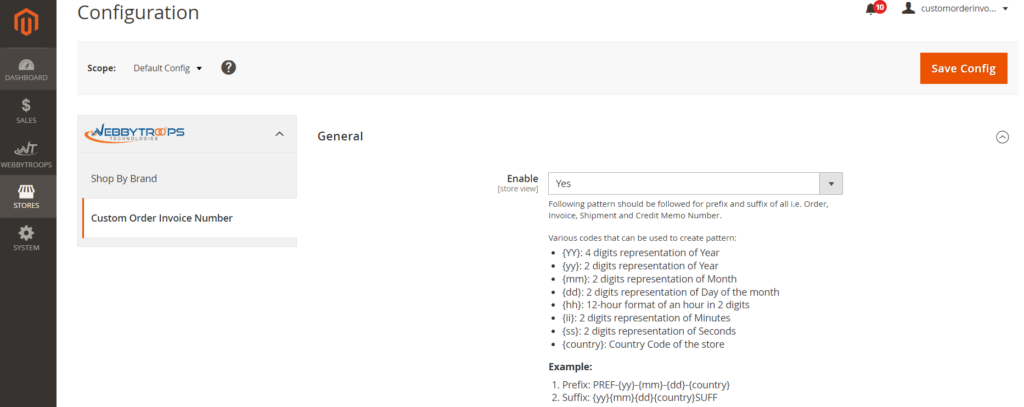
List of codes that can be used are:
- {YY}: 4 digits representation of Year
- {yy}: 2 digits representation of Year
- {mm}: 2 digits representation of Month
- {dd}: 2 digits representation of Day of the month
- {hh}: 12-hour format of an hour in 2 digits
- {ii}: 2 digits representation of Minutes
- {ss}: 2 digits representation of Seconds
- {country}: Country code of the store
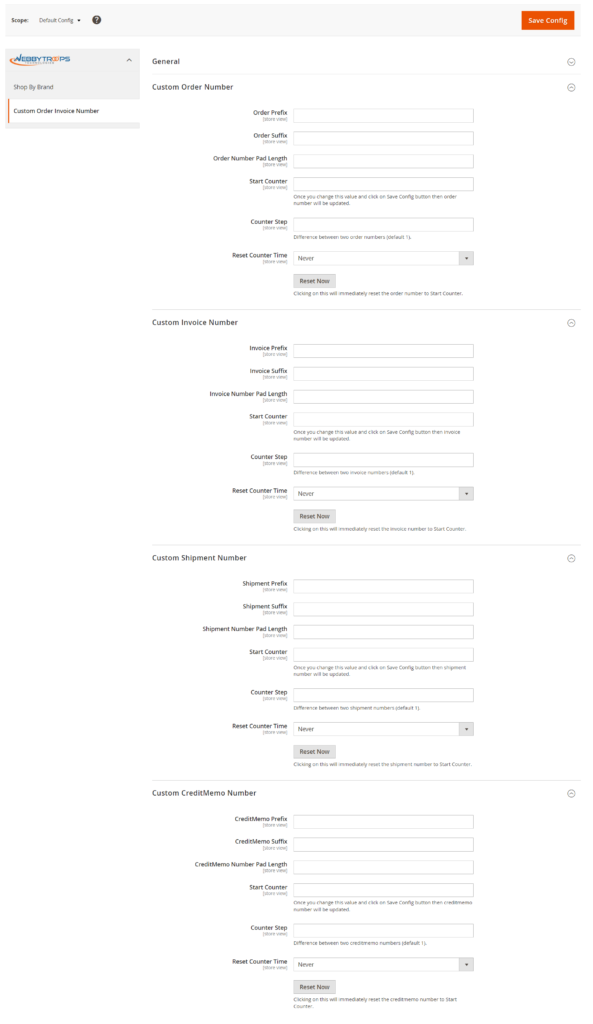
2. How to Use Start Counter, Counter Step and Reset Counter
- Start Counter: The Start Counter option is used to change the starting number of the order/invoice/shipment/creditmemo. Once you change the start counter and save the changes, the next number generated will start from that value.
- Counter Step: This option determines the difference between two numbers. For example, if you set the Start Counter to 100 and Counter Step to 5, the subsequent numbers will be 100, 105, 110 and so on.
- Reset Counter Time: With this feature, you can define the time interval at which the Order, Invoice, Shipment, and Credit Memo numbers will be reset to the value specified in the Start Counter field. You can set it to reset every day, week, month, or year.
- Reset Now Button: The Reset Now button is used to immediately reset the order/invoice/shipment/creditmemo number to the value defined inside the Start Counter field.
3. How to Enable the Custom Order Invoice Number Extension
- Navigate to the “Custom Order Invoice Number” section under “Stores > Configuration > WebbyTroops” and enter the license key.
- Go to “Store > Configuration > WebbyTroops > Custom Order Invoice Number > General” and set “Enable” to “Yes.”
4. Custom Order Number
To create a custom format for Order Number, go to: Stores > Configuration > WebbyTroops > Custom Order Invoice Number > Custom Order Number. Here, you can add a prefix and suffix by using the codes mentioned earlier (in point 1). You can also change the padding length of the main number. The final order number will be like: {PREFIX}{NUMBER}{SUFFIX}.
or
- WebbyTroops -> Custom Order Invoice Number -> Custom Order Number
- Enable this module
- Add Prefix
- Add Suffix
- Add Order Number Pad Length (Default 9)
- Start Counter
- Counter Step
- Save Config
- Cache Flush
5. Custom Invoice Number
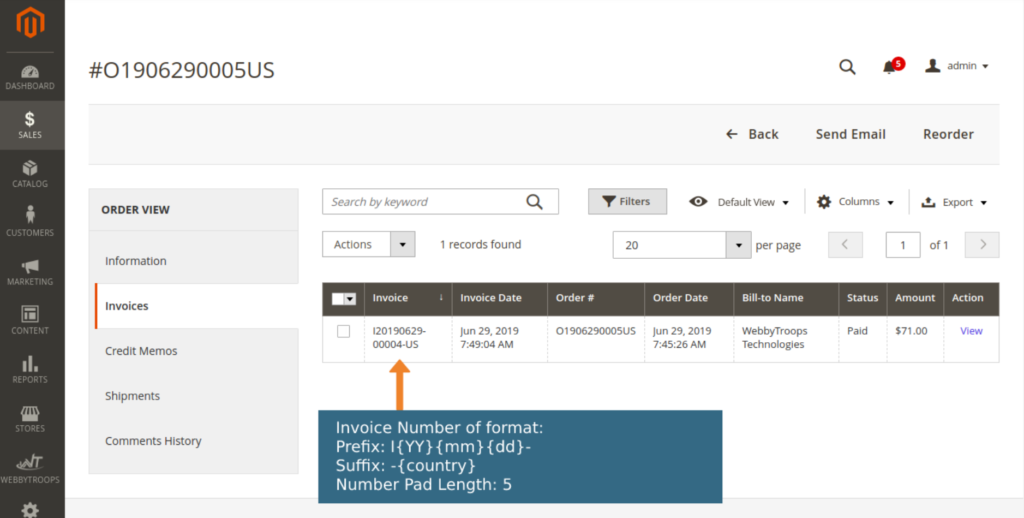
You have the ability to customize your invoice number by creating your own format. This includes the option to add a prefix or suffix using the codes provided in point 1, as well as change the length of the main number. Your final invoice number will be in the format of {PREFIX}{NUMBER}{SUFFIX}. To create your own invoice number, simply navigate to Stores -> Configuration -> WebbyTroops -> Custom Order Invoice Number -> Custom Invoice Number.
OR
WebbyTroops -> Custom Order Invoice Number -> Custom Invoice Number
- Enable this module
- Add Prefix
- Add Suffix
- Add Invoice Number Pad Length (Default 9)
- Start Counter
- Counter Step
- Save Config
- Cache Flush
6. Custom Shipment Number
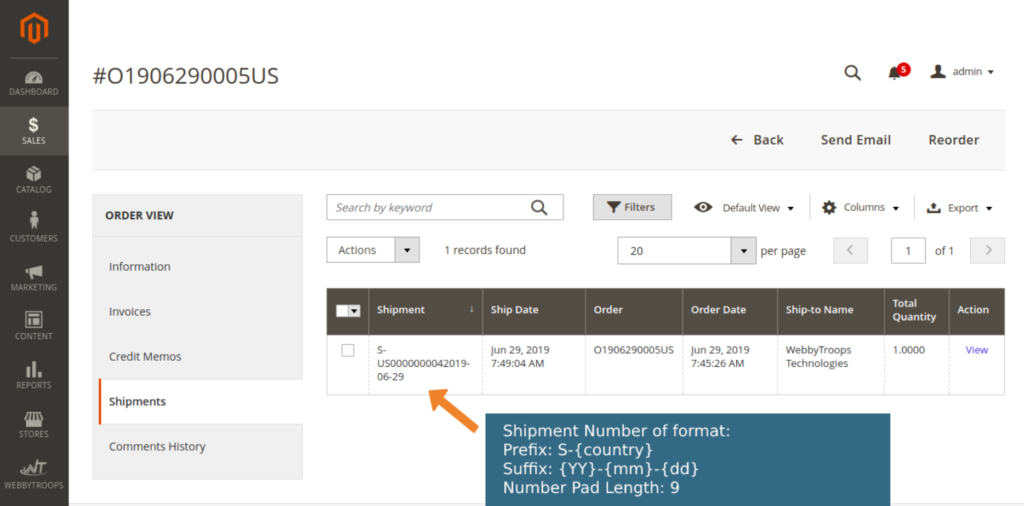
You have the ability to create a customized format for your Shipment Number by adding a prefix or suffix using the codes provided in point 1, as well as adjust the length of the main number. Your final shipment number will be in the format of {PREFIX}{NUMBER}{SUFFIX}. To create your own shipment, navigate to Stores -> Configuration -> WebbyTroops -> Custom Order Invoice Number -> Custom Shipment Number.
OR
WebbyTroops -> Custom Order Invoice Number -> Custom Shipment Number
- Enable this module
- Add Prefix
- Add Suffix
- Add Order Number Pad Length (Default 9)
- Start Counter
- Counter Step
- Save Config
- Cache Flush
7. Custom Credit Memo Number
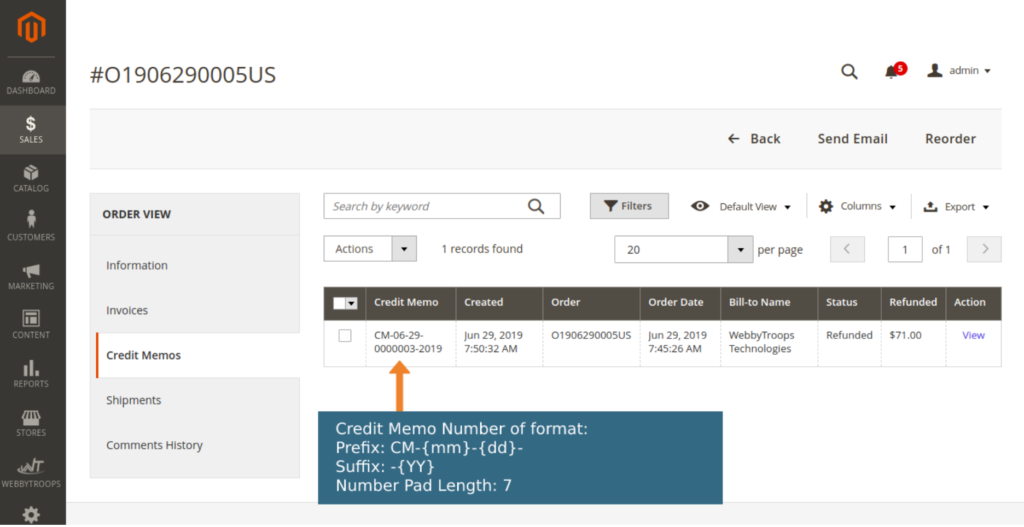
You can customize the format of your Credit Memo Number by adding a prefix or suffix using the codes provided in point 1, as well as change the length of the main number. Your final order number will be in the format of {PREFIX}{NUMBER}{SUFFIX}. To add a new link to the top menu, go to Stores -> Configuration -> WebbyTroops -> Custom Order Invoice Number -> Custom Credit Memo Number.
OR
WebbyTroops -> Custom Order Invoice Number -> Custom Credit Memo
Number
- Enable this module
- Add Prefix
- Add Suffix
- Add Order Number Pad Length (Default 9)
- Start Counter
- Counter Step
- Save Config
- Cache Flush
Support & Discussion
If you need support or have any questions, please feel free to contact: contact@webbytoops.com

